Tuttnauer BrinkMann 2540M-Autoclave SOP
Primary Equipment:
Autoclave
Created: February 25, 2010 by Tony Butterfield
Revised: January 7, 2014 by Tony Butterfield
University of Utah, Chemical Engineering
The 2540M Autoclave sterilizes tools and liquids with high pressure steam (Figure 1). This SOP gives a basic overview of the autoclave”s operation; a more detailed explanation of the autoclave”s features may be found in its manual.
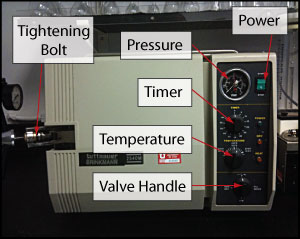
Figure 1: Tuttnauer BrinkMann 2540M Autoclave
Sample Preparation:
- All items should be on a tray and tools of different metals should be placed on different trays (carbon steel should not be in contact with the stainless steel tray; use paper to separate).
- Place empty containers upside down, to prevent accumulation of liquid; however, be sure they are not tightly sealed, to avoid pressure buildup.
- Tubing should be open on both ends and free of sharp turns.
- Liquid containers should be filled no more than 2/3 full, to prevent spills. and should be covered with appropriate covering (e.g. tin foil), but never sealed tightly
- Items should not be touching, and there should remain adequate volume for steam circulation.
Autoclave Operation
- Make sure the Valve Handle is turned to “0” (Figure 1). Important: The Valve Handel should only be turned clockwise.
- Open the chamber on top of the autoclave (Figure 2) and check the dipstick attached to the chamber lid to see where the water level is with regards to the maximum marked on the dipstick.
- Each run of the 2540M autoclave will use approximately 350 ml of distilled water.
- Look into the chamber and you can see the safety valve. Under no circumstances should the water be above the safety valve holder. If the water level in the chamber is not at or near the maximum, pour 350 ml of distilled water into the chamber.
- With the door open turn the Valve Handle to “Fill” and watch as water begins to fill the autoclave. Once the water has reached the Fill Line (Figure 3) turn the Valve Handle to “STE” (Sterilize position).
- Load the autoclave with your prepared samples, as described in Step 1.
- Shut the door and turn the Tightening Bolt (Figure 1) until the door is securely closed.
- Select the operating temperature (100 – 134°C), and then set the timer accordingly (Figure 1).
- With T = 121°C (appropriate for liquids and temperature sensitive solids), 50 minutes is recommended.
- With T = 134°C (Unwrapped solids, metal and glass), 20 min is recommended.
- If you are beginning from a room temperature autoclave (cold start), allow for an extra 10 minutes to heat up.
- Turn the main power switch to “Start”.
- Once the cycle is done the timer will buzz.
- If sterilizing liquids, before continuing, leave the Valve Handle on “STE” after the cycle is complete to allow steam to escape slowly.
- If not sterilizing liquid you may turn the Valve Handle to “EXH + DRY” (exhaust and dry) immediately after the cycle finished.
- If you wish to dry your load:
- When the pressure gauge returns to zero, turn the main power to “Stop”, open the door and remove your load.
- Turn the Valve Handle to “0”.
- Else, if you do not wish to dry your load:
- When the pressure gauge returns to zero, open the door approximately 1 inch.
- Set the timer to 20 – 30 minutes.
- When the timer is finished, turn the Valve Handle to “0”, turn the main power to “Stop” and remove the load.
- When you are finished using the autoclave for the day:
- Clean off the door gasket.
- When you are finished using the autoclave for the week or for your project:
- Remove the trays and tray holder and clean the autoclave”s interior (Use water and detergent. Do not use steel wool or brushes).
- Put two drops of lubricating oil on the two door hinges and tightening bolt.
- Drain the water from the reservoir.
- Every other month:
- Operate the safety valve (See manual, page 25).
- Check the air trap jet (See manual, page 24).
- Clean the water filter (See manual, page 18).
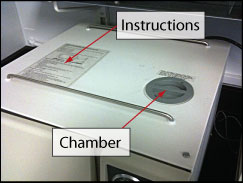
Figure 2: Top of the Autoclave.
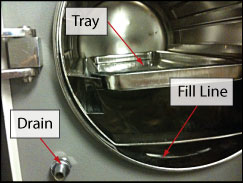
Figure 3: Inside the Autoclave.