EEA/2000 Vacuum Ebulliometer SOP
Primary Equipment:
Ebulliometer
Created: December 14, 2010 by Tony Butterfield
Revised: October 4, 2013 by Tony Butterfield
University of Utah, Chemical Engineering
This is an abbreviated operating procedure for the ebulliometer in our lab. Refer to the EAA-2000 manual for more specific information.
Figure 1 shows the ebulliometer and details of its control panel and pressure control valves.
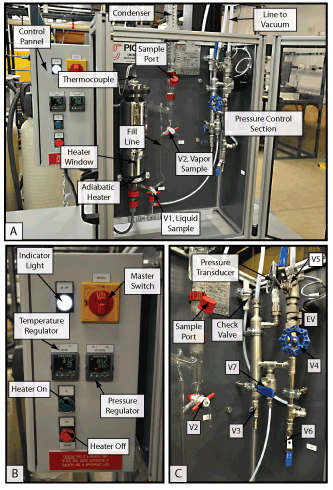
Figure 1: The Ebulliometer. A) The entire front view of the ebulliometer. B) Control Pannel. C) Valves and pressure control.
Starting an Experiment
- Mix your solutions to the desired concentration. The adiabatic boiling point measuring apparatus (referred to heater from here on) typically holds between 250 and 500 ml of liquid.
- Open the sample port, and, using a funnel, slowly begin to pour your solution into the ebulliometer.
- Care must be taken to avoid overflowing, as the tubing entering the heater has a small diameter. It will take a minute or two to safely pour your entire sample.
- The ebulliometer must not be turned on until the heating element is sufficiently submerged. You can see the brown heating element and liquid level in the heater widow, and there is a blue fill line between valves V1 and V2 which should indicate the safe fill level (see Figure 1A). However, check both the blue fill line and heater window to assure you are at a safe level before turning on the apparatus.
- The ebulliometer must not be turned on if the liquid level is above the height of V2.
- Also, note that particular care should be take to avoid breaking the glass tubing below the sample port; it is delicate and difficult to replace.
- Tighten the cap to the sample port.
- Turn on the cooling water to the condenser using the pressure regulator. The condenser cannot take pressures in the cooling stream above 14 psig, and modest flow rates, on the order of 2 liter per min, are sufficient (a minimum of 100 liter per hour is necessary).
- Check to assure there are no leaks in the cooling water piping.
- Check to assure all valves are in the proper position (see Figure 1C).
- Working at atmospheric pressure:
- Open = V6, V5, V4.
- Close = V3, V7.
- V1 and V2 should not be in the sampling position.
- Working in vacuum:
- Close = V3, V6, V7, V4.
- V1 and V2 should not be in the sampling position.
- If working between 100 and 300 mbars, open V5 1/4 of a turn.
- If working between 300 and 900 mbars, open V5 1/8 of a turn.
- Set the controlled valve (EV) to your desired set point pressure and set the regulator to AUTO, or manually set the valve opening, if the experiment so requires.
- Turn on the vacuum pump and then open V4.
- Once the pressure has stabilized, you may proceed. See the manual for suggestions on tuning the controller if a proper, stable pressure is not achieved.
- Turn on the Master Switch on the control panel; the adjacent indicator light should illuminate if the unit is receiving power. Also, the temperature and pressure regulators should light up and display the T and P readings.
- Close the doors to the ebulliometer.
- The temperature regulator should start up in manual mode. If not, or if you wish to use the automatic temperature controller see the manual for details.
- Set the heater to 100% and continuously watch for boiling in the heater window. Once boiling begins, decrease power to 60% (Note that different solutions will have different power requirements to maintain boiling).
- Once the temperature has stabilized and you see vapor dripping from the condenser, wait at least an additional 10 min before you collect a sample to assure steady state in composition.
- If the cleanliness of the ebulliometer is in question (particularly if a substantially different solution was last used), you may wish to use your first run to throughly rinse out the apparatus. If so you may stop after the first 10 minutes of boiling and drain the ebulliometer, following the direction in the Shut Down portion of this SOP, and then begin again at Step 1.
- To collect a sample at atmospheric pressure:
- For the liquid phase, place a container under V1 and set the valve to the sampling position. Note that the first 5 ml, approximately, of sample from this valve will be contaminated with condensed vapor and must be discarded.
- For the condensed vapor phase, place a container under V2 and set the valve to the sampling position.
- Samples are hot. Let them cool before you touch them.
- To collect a sample at vacuum:
- Secure a sample tube to the opening under V1 for the liquid phase, or V2 for the condensed vapor. Screw the lid tight to assure a connection, and connect the flexible tubing from V7 to the other opening of the sample tube.
- Open V7 to equalize the pressure in the sample tube and wait until the temperature has stabilized again.
- Set the sample valve (V1 or V2) to the sampling position to collect your sample.
- Samples are hot. Let them cool before you touch them.
- Set the sample valve (V1 or V2) to the non-sampling position, and remove samples.
Shut Down
- Press the off button on the control panel to assure the heater is off before draining.
- Maintain cooling water flow until the temperature reading falls below 30 C.
- Place a collection vessel under V1 and turn V1 to the sampling position to drain heater.
- Turn off the cooling water.
- Close V5, and open V3, V6, and V7.
- Switch off the Master Switch on the control panel.
- Remove V1 and V2, the thermocouple, and sample port cap. Unscrew the caps at the top of the condenser and bottom of the heater, and allow the system to dry overnight.
- If shutting down for long periods of time follow the cleaning procedure detailed below.
Change the composition of an existing sample
- Turn the power sent to the heater down to 0%, and, if working at vacuum, return the ebulliometer to atmospheric pressure.
- Remove the desired measure of liquid from V2, if necessary.
- Wait for the solution to cease boiling, and wait another 5 min, so that the addition of cold liquid does not cause the hot glass to crack.
- Slowly, add the desired measure of liquid through the sample port in small increments. Be sure to return the liquid level to the height described in the startup steps of this SOP.
- Close the sample port and return the ebulliometer to the desired temperature and pressure.
Cleaning the interior of the ebulliometer
- Empty the ebulliometer completely.
- Conduct a run of the unit, as described above, using only DI water.
- Empty the condensed water vapor for 15 min (be sure the level does not go below the minimum).
- Stop the heater and empty the unit.