Laser Cutter, Hurricane Ivan
Primary Equipment:
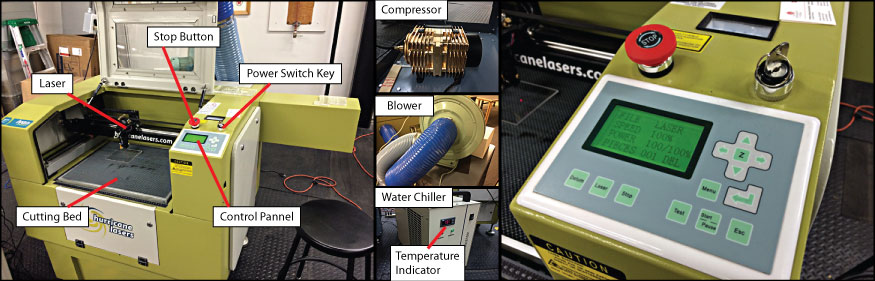
Laser Cutter
Created: January 4, 2014 by Tony Butterfield
Revised: January 20, 2014 by Tony Butterfield
University of Utah, Chemical Engineering
This is an abbreviated operating procedure for the laser cutter in our lab. Refer to the manual for more specific information.
Start Up
- Before your turn on the laser, turn on the following three pieces of equipment:
UNDER NO CIRCUMSTANCES SHOULD THE LASER BE OPERATED WITHOUT THESE THREE PIECES OF EQUIPMENT TURNED ON AND WORKING PROPERLY - The compressor. Check to assure air is blowing out of the tip of the laser head..
- The blower. Air should be flowing down through the bed of the cutter and into the fume hood.
- The water chiller. The temperature on the front of the water chiller should be monitored during operation and should remain below 25°C.
- Be sure the laser bed is clear of obstacles and the laser should be able to move freely.
- To turn on the laser cutter:
- If the “Stop” button is depressed, turn it clockwise to release it.
- Turn the key on the front panel clockwise to the “on” position.
- When the cutter is turned on the display should light up and the laser should move to the far back right position of the cutting bed.
Height Adjustment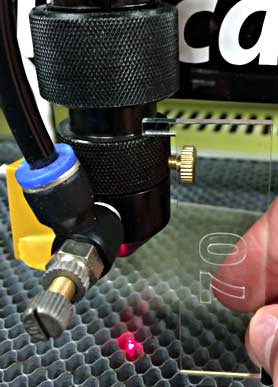
If you do not know if the bed is at the proper height for the thickness of the material, you can adjust the bed height to the proper level.
- Place your material on the cutting bed.
- Position the laser over the material using the arrow buttons on the control panel. If the laser does not move you may have to press the escape key “Esc”.
- Press the “Z” button in the center of the arrow buttons. The up and down arrows will now move the cutting bed up and down, respectively.
- Find the height standard (the piece of acrylic with “70” on it as seen in the adjacent figure).
- Place the base of the height standard on your material and adjust the height of the bed until the lip of the height standard is on top of the attachment for the laser cone, as shown in the adjacent figure.
- Be very careful when adjusting the height that you do not smash your material into the laser cone.
- When done adjusting the height, press the “Z” button once more to return to x-y manipulation of the laser.
Cutting File Creation
If you do not want to use the native Lasercut drafting tools, the software that operates the laser may also import 2-D dxf files. These files may be created with a wide assortment of software. Software that we have used:
- Adobe Illustrator
- Inkscape, a free Illustrator alternative.
- AutoCad.
When creating images in Illustrator, be aware grouped items and filled shapes will not translate. All shapes should be outlines only, all text should be flattened into shapes, and nothing should be grouped.
Note that the cutting bed is 40cm X 50cm, and you may want to account for those dimensions in your drawing. Also be aware that the different colors of lines you use in your drawing will correspond to different laser cutting powers and speeds, once you transfer the dxf file to the laser software. Different colors may also be made to indicate a “Cut” shape where the laser only traces the shape outline, or an “Engrave” shape where the laser scans the entire interior of the shape.
Uploading a Cut File to the Laser
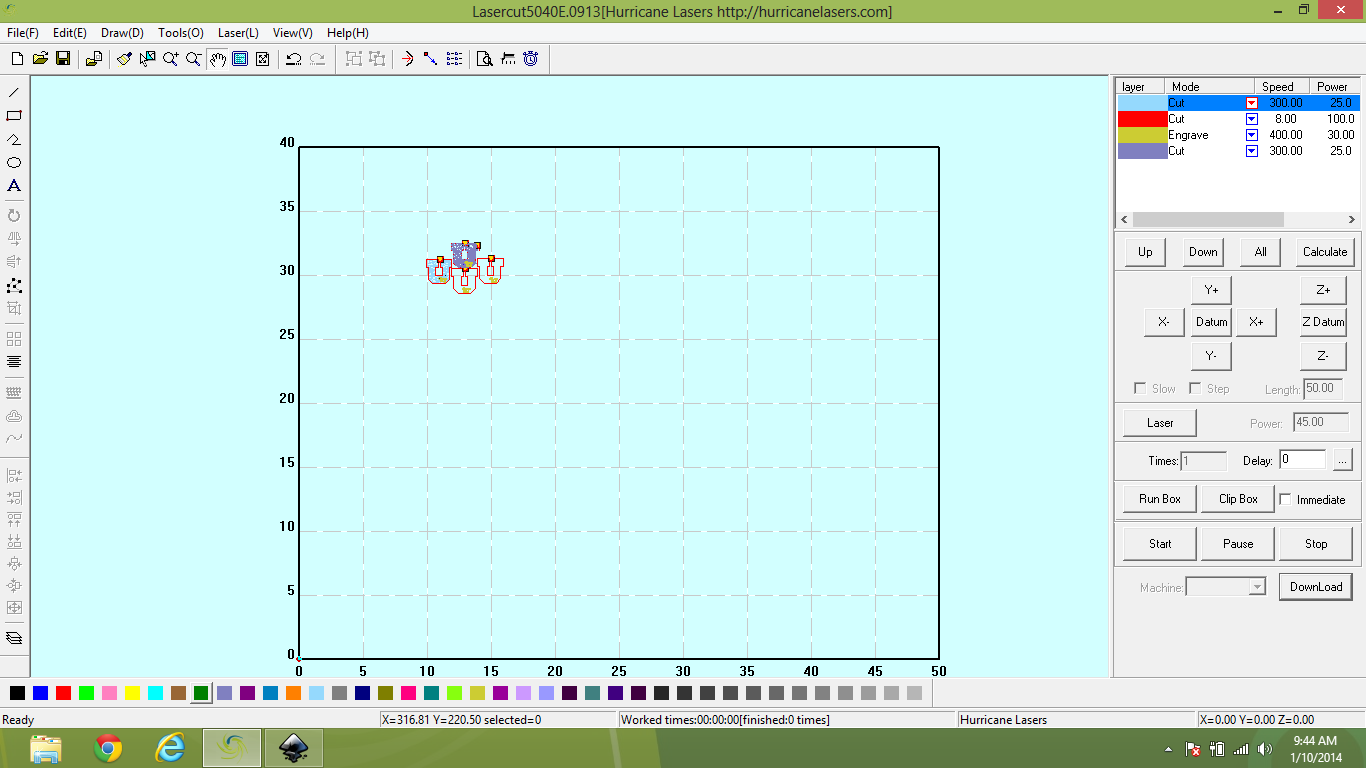
- Open the Lasercut software from the desktop of the laptop attached to the laser cutter. The interface is shown in the screenshot above.
- From here you may draw your own cuts from the tools in the left toolbar. However it is often simpler to create your drawings in another program and import the dxf file:
- Click “File”.
- Select “Import”.
- Find and select your dxf file.
- Check to assure your file imported correctly.
- Once you have your drawing you must designate which laser behavior will correspond to which line colors. In the top right panel of the Lasercut interface you will see each color used under the “layer” column.
- Double click each color to choose laser behavior.
- “Cut” will move the laser only around the edge of the shape and is generally use with high power and low speeds to cut through the material. “Engrave” will scan the laser across the entire interior of the shape and it is typically used with low power and high speeds to merely alter the surface appearance of that shape.
- Laser speed and power needed to cut through differ depending upon material type and thickness. A table for various materials may be found below the laptop. A typical cut for 1/4″ acrylic may be 8 mm/sec and a power of 100% for our 80W laser. To engrave power should be around 15% and speed should be around 500 mm/sec.
- Once you have settled on cut modes you must download your drawing to the laser
- First assure the “immediate” checkbox in the lower right of the interface is not checked. If checked the laser will start cutter from wherever it is currently positioned, not relative to the top right corner of the cutting bed (if you get a “soft stop” error, this may be your problem). Without this checked, the laser will cut material relative to the bed, just as it is shown in your drawing.
- Click the “Download” button at the bottom left of the software interface. The following window will pop up.
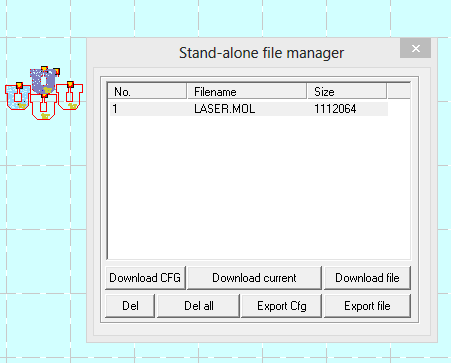
- The top of this window shows a list of programs already in the laser memory.
- If files are there, you may delete them all by hitting the “Del All” button.
- Then click “Download Current” to put your drawing into the laser memory.
Cutting
- Once your cut file is in the laser memory, place your material on the cutting bed.
- Check to be sure there are no materials in the cutting area that may be hit by the laser once it is moving.
- Press the “Test” button. The laser will trace a box that outlines the cut shape and then move to the center of the cut shape. Use this feature to assure you know where your cuts will be made and that the material is positioned correctly.
- Close the lid.
- Assure that the compressor, blower, and water chiller are on, and that the water temperature is below 25 C.
- Press the “Start/Pause” button. The laser should begin cutting your design.
- Do not leave the laser unattended as it poses a fire risk. Periodically check the water chiller temperature.
- If anything goes wrong, press the “Stop” button.