Modular Benchtop Fermentor Operation, New Brunswick Scientific Company, BioFlo 110
Primary Equipment:
Bioreactor
Created: November 30, 1999 by Edward M. Trujillo
Revised: August 10, 2010 by Tony Butterfield
University of Utah, Chemical Engineering
This is an abbreviated operating procedure for the bioreactor in our lab. Refer to the BioFlo 110 manual for more specific information.
- Open the main cold water valves and air valves show in Figure 1.
- Be sure the drain to the bioreactor jacket goes into the sink.
- Turn on PC computer on the west side of the Biolab and sign in (user name: biolab, and password: biolab). The Opto program is only usable if you log in, on the local machine, using the biolab account user name: BIO_LAB COMPUTE.
- Assemble the bioreactor, if it is not already assembled for the type of experiment you plan to do.
- Make sure both the dissolved oxygen electrode and pH electrode are immersed in a distilled water solution or the aqueous solution you plan to use for fermentation.
- Fill the vessel using an open port in top of the reactor and a funnel and empty the vessel using the peristaltic pump provided.
- It is suggested you fill the reactor vessel up to the 1.5 liter mark.
- Switch on the main power to the bioreactor located on the Power Controller module (see Figure 2). This turns on everything else (unless someone has changed the switches on the different units), including the primary control unit located on top of the power control unit.
- The orange display on the primary control unit should default to the setup screen on startup (Figure 3). If not, push the Startup Key. The bioreactor can be setup to run in either a fermentation mode or a cell culture mode. Make sure the unit you are using (the control unit can control up to 4 reactors, we only have one � Unit 1) is setup for fermentation mode by pressing the USE key using the Select Buttons on the setup screen. Then set the unit to fermentation mode by pressing the Select Button again on the next screen. Also, you have the option to select the language used for the controller. I suggest you use English.
- The Main Menu (showing the status of the bioreactor) is obtained by pushing the Main Menu Key depicted in Figure 3.
- Note that on startup (default) the O2 loop on the Main Menu is set to Manual mode, while all the other loops are set to OFF. With our setup this activates the gas coming from the gas mixer. Set the O2 loop to OFF to turn off the gas coming from the gas mixer. You can set this back to MANUAL when you are ready to use the gas mixer and have connected the line from the mixer to the rotameter (see 10 below).
- Fill the water jacket with tap water using the temperature control setting (Main Menu) on the primary control unit by:
- Setting the temperature control to AUTO.
- Entering a temperature setpoint that is at least 5 C below the current bioreactor temperature. The controller will respond to the call for cooling by opening the solenoid valve, filling the water jacket. The water overflow will go into an overflow tube located in the water jacket (in the back) and drain to the sink. Flush with at least 2 jacket volumes of water. You can stop the water from flowing to the drain by setting the setpoint to the desired bioreactor temperature (typically above the current temperature).
- Test the Agitator Control by setting the agitator control to AUTO and setting a setpoint between 0 and 1200 rpm. This is how you control the agitation speed if you are not using the Gas Mix Controller or the dO2 controller.
- Gas flow is controlled for fermentation two ways:
- Manifold Control (Figure 1e).
- Make sure the connection from the outlet of the manifold is connected to the inlet of the rotameter (using the quick disconnects).
- Each gas is controlled by a separate needle valve located on the manifold. The flow rate to the bioreactor is controlled by the rotameter located downstream from the manifold.
- Typically, the needle valves will be in an ON/OFF situation, adjust them only to give the maximum flow rate of 1200 CCM (cubic centimeters per minute) on the rotameter. Use the rotameter to adjust the total volumetric flow to the bioreactor.
- Make sure the pressure regulators on the cylinders that you are using are set to approximately 10 psig.
- Gas Mix Control.
- When using this control, the dO2 setting, make sure the output connection from the gas mixer is connected to the inlet of the rotameter (using the quick disconnects) and the valves on the individual gas cylinders are open (open only those you will use).
- Make sure the pressure regulators on the cylinders are set to approximately 10 psig.
- You have four control choices to choose from in this mode: Agitation, Oxygen, Agitation/Oxygen or None. Each of those is described in the manual, however the Agitation/Oxygen control is the one used most frequently, since it controls the dissolved oxygen level by both agitation and the mix of air and oxygen. However, if you want to keep a constant agitation rate throughout your fermentation, you may want to use the Oxygen control mode. In the dO2 details screen, press the setup button. From here you can set the high and low limits for agitation and the gains for process control. Change the P-Gain and I-Gain ONLY if you understand what you are doing. Now press the Cascade selector button. From here you can choose one of the four options. Usually, you will choose the Agitation/Oxygen option but the Oxygen option is also possible.
- Dissolved Oxygen Probe Calibration � The dO2 sensor is a polarographic probe manufactured by Ingold (Mettler-Toledo, InPro 6000 series O2 sensor). If the sensor has been disconnected from the transmitter for longer than 5 minutes it has to be polarized prior to calibration by connecting it to the transmitter or a polarization module for 6 hours. You should calibrate the dissolved oxygen probe before using it for your fermentation. Normally, a single point calibration is sufficient. This is done by placing the probe into a medium of known dissolved oxygen concentration, typically distilled water at a constant temperature and pressure that is in equilibrium with a sparging gas (typically air). Note the probe only measures % saturation. The actual dissolved oxygen concentration has to be obtained from reference tables. Keep in mind that most reference tables for dissolved oxygen assume atmospheric pressure at sea level. A correction must be made to those values for pressure at our altitude.
- To calibrate the dO2 probe choose the dO2 screen from the Main Menu. From here you can choose the setpoint, choose the upper and lower limits for the display screen (Disp Hi � Disp Lo), calibrate the probe (Calibrate) and set the process control parameters (SETUP) such as the deadband, output multiplier, and the P and I gain. Set the control to AUTO. Next, push the CALIBRATE button. Normally you do not have to set the zero, but if you want to (dual point calibration), the easiest method is to momentarily disconnect the O2 probe from the transmitter (no more than 5 minutes) and once the reading is stable at zero, push the set zero selector button and enter zero. Reconnect the O2 probe to the transmitter. The Set Span selector is used for the 100% calibration. Once the probe reaches a steady value, indicating equilibrium with the medium and the temperature is constant, press the Set Span button and enter 100, indicating the probe (and medium) is 100% saturated with the sparging gas. Keep in mind that it usually takes a long time for a solution to get completely 100% saturated.
- pH Control.
- Choosing the pH selector button from the Main Menu, brings up the pH control screen. From here you can choose the setpoint, choose the upper and lower limits for the display screen (Disp Hi � Disp Lo), calibrate the probe (Calibrate) and set the process control parameters (SETUP) such as the deadband, output multiplier, and the P and I gain. Typically, you will use the default parameters for SETUP. You should, however, calibrate your pH probe before you use it. This is explained in the bioreactor manual, starting on page 63 (actually page 65 starts on calibration). Note that you have to physically remove the probe from the bioreactor in order to do the calibration. Be sure to rinse the probe with distilled water before you place it back into the bioreactor.
- pH is controlled by two concentrated solutions of acid and base. Typically, you will use a sulfuric acid solution and a sodium hydroxide solution, approximately 10% by weight. bDO NOT USE HYDROCLORIC ACID IN THE BIOREACTOR/b. HCl corrodes stainless steel. The acid and base solutions are placed in their respective sterile bottles and connected to the appropriate pumps using the existing plastic tubing. Make sure all the lines to and from the pumps are filled before connecting the lines to the bioreactor. Use the triport on top of the reactor for the acid, base and antifoam lines.
- Once everything is setup, you can choose the setpoint for the pH and the controller will control the pH in the bioreactor at that setpoint by turning on and off the acid and base pumps. I suggest this is the last controller you setup.
- Antifoam Control � the bioreactor is setup for antifoam control. Pumping a concentrated antifoam solution into the vessel using one of the peristaltic pumps does this. There is a foam sensor mounted in the headplate of the vessel that senses the presence of foam and responds by turning on the antifoam pump. Make sure there is ample antifoam in the addition bottle and that the tubing going to and coming from the pump is completely filled and connected to the triport on the headplate.
- Go back to the Main Menu and make sure the readings are reasonable for the variables you selected. You are now ready to monitor the readings using the computer software.
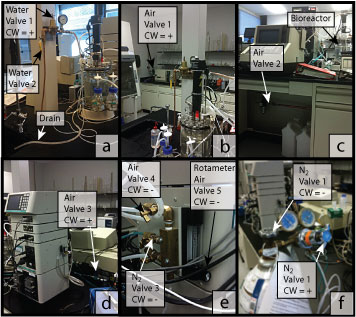
Figure 1: Air and Water Valves for the Bioreactor.
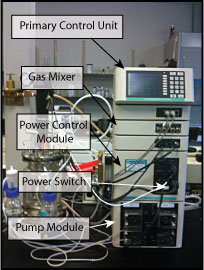
Figure 2: Bioreactor Modules.
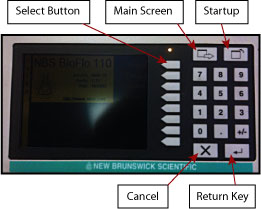
Figure 3: Bioreactor Primary Control Unit Control Panel.
SHUTDOWN AND CLEANUP PROCEDURES
- Turn off the agitator, gas flow, and temperature control.
- Empty the vessel using the peristaltic pump and then flush/agitate the reactor at least twice with hot distilled water. Use the agitator to clean the vessel during each flush, but make sure to turn off the agitator during filling and emptying. You may have to use a dilute acid solution (sulfuric acid) or a mild detergent solution to get the vessel completely clean.
- MAKE SURE THE VESSEL IS FILLED WITH DISTILLED WATER (1.5 LITERS) AT THE END OF FLUSHING AND CLEANING. The dO2 probe and the pH probe need to be immersed in water when left overnight. For long-term storage, see the bioreactor manual.
- Turn off all the controls on the primary display unit
- Turn off the main power switch.
- Turn off the main water valves and the main air valves show, as well as all the valves on the gas cylinders.
- Sign off and shut down the computer.