Synergy-HT Bio-Tek, Microplate Reader SOP
Primary Equipment:
Plate Reader
Created: February 23, 2010 by Tony Butterfield
Revised: February 23, 2010 by Tony Butterfield
University of Utah, Chemical Engineering
The Synergy-HT multi-mode microplate reader measures the absorbance, luminescence, and transmittance of many small volume samples, prepared in microplates. This SOP give a basic overview of its operation; a more detailed explanation of the plate reader�s features may be found in the manual.
- Turn on and login to the computer next to the plate reader (Figure 1). (username: biolab, password: biolab)
- Turn on the power to the plate reader. The switch is on the front of the device.
- The tray will open and present the microplate carrier.
- Start the program �KC4� from the computer�s desktop.
- Click the �Read� button.
- Select the detection method required for your assay (Absorbance at 660 nm for yeast cell concentration is common).
- Select Reading Type:
- End Point � Each well is given one value for each wavelength or filter at one point in time.
- Kinetic � The plate in this case is read multiple times at a particular wavelength at a given time interval (After picking this option, click the Kinetic button to set the interval).
- Spectrum � This mode only works with the Absorbance detection method. In this case a range of wavelengths are measured for each well.
- For Endpoint and Kinetic readings, select the wavelengths you wish to monitor (up to 6) from the dropdown list. For Spectrum reading, enter the wavelength start and stop points.
- Select the plate size (The standard size in the lab is the 8×12, 96 Well Plate).
- If you wish, you may also set the temperature within the chamber under the �temperature Control� heading.
- Click Ok once you have set all your settings.
- You may enter read descriptions in the Plate Reading dialogue box, or simply click �START READING�.
- The plate reader door will open, if it isn�t open already, and present the carrier. Insert your prepared sample plate and press �Ok�.
- The reading will then begin.
- After the reading is finished your data will appear in the Results window and the carrier will eject.
- To put the data into a format suitable for Excel, click File => Export. Select the data you wish to export (e.g. if one of your wavelengths was 570 nm, select �M#1 570� for export) and click �Add>>�. I you did a kinetic reading, you will need to select the read number min and max you wish to export under the �Kinetic readings� heading�, before you can add that data. Once you have selected all the desired data, click Ok and save it in a proper location. The resulting file is a comma-delimited text file.
- To take another reading, you must click the �New� button and begin the process again.
- When you are done, remove the plate, exit the software, close the tray , and turn the plate reader�s power off.
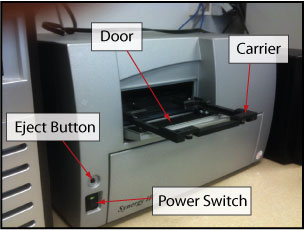
Figure 1: Synergy-HT Bio-Tek Microplate Reader.