Cell Counter SOP, NucleoCounter, YC-100
Primary Equipment:
Cell Counter
Created: November 22, 2009 by Tony Butterfield
Revised: February 22, 2010 by Tony Butterfield
University of Utah, Chemical Engineering
This is an abbreviated operating procedure for the cell counter in our lab. Refer to the NucleoCounter YC-100 manual for more detailed information.
- Make sure the USB cable between the computer and cell counter is connected and turn on the computer.
- Once the computer is on, turn on the cell counter by pressing the power button (Figure 1). You will hear a noise as the motor starts up, and, if successful, you should see the display read �Ready�.
- Start the NucleoView and NC Receiver Software, if you haven�t already.
- Collect 200 microliters of your yeast sample, or diluted sample, using a micropipette (100 microliters is the minimum sample volume).
- Deposit the sample in a 1.5 ml plastic centrifuge tube.
- If you wish to only count the number of non-viable cells, skip to Step 11 in this SOP. If you wish to count the total number of cells, continue on to Steps 7-10, which describe how to lyse the living cells, making them permeable to the fluorescent DNA dye (non-viable, or dead cells are already assumed to have permeable membranes).
- A glass screw-top container of lysing buffer is kept near the large bottle of lysing buffer on the shelves on the south side of the bioreactor room. Use this small volume to avoid contaminating the larger, stock solution. Replenish the small volume if you run out.
- With a new pipette tip, put 200 microliters of lysing buffer into the centrifuge tube containing your sample.
- Mix the solution by turning the vial upside down 5 to 10 times or by using a vortex mixer. Take care when opening the sealed centrifuge tube; a film may form on the top due to the surfactant in the buffer.
- The lysed sample may be stored at room temperature or in the refrigerator �for some time,� according to the manual, before it is analyzed. If you do wait, remember to mix the solution well before continuing on to the next step.
- Sample cassettes (Figure 2) are used to load the sample into the cell counter and contain the dry fluorescent dye needed. They come in packages of ten and expire after 2 weeks of the packages being opened. When handling them, be sure to not prematurely depress the loading piston or touch the sample window.
- Take a cassette and insert its tip fully into the sample; press the loading piston gently with your thumb until your thumb and the top of the piston are flush with the cassette surface. The sample should now be loaded in the cassette.
- Release the piston (it will remain depressed, in place) and remove the tip from the solution taking care to keep droplets from adhering to the outside.
- Inspect the cassette to make sure no air bubbles were included in the sample. Also, make sure the sample is between the maximum and minimum allowable volume (Figure 2).
- Open the lid of the cell counter and, gripping the cassette on either side of the piston barrel, insert the cassette, beveled edge down, into the insertion slot. Keep the cassette�s tip pointing towards your wrist.
- Press the cassette down until you hear a click, and the sampling tip is parallel to the diagonal slope of the opening (Figure 3).
- Close lid.
- Press the �Run� button on the cell counter and the display will read �Analyzing�. Once the sample is finished the data will appear on the cell counter�s display and in the NucleoView software.
- Once the data is received, the cassette can be removed by pulling up on the piston barrel.
- If the sample is too concentrated, you will not get a reliable measurement. A typical aerobic yeast bioreactor run in our lab needed a 1:5 dilution after 5 hours of operation at 35 C, with a 2 g yeast/L inoculum.
- To save an image: Under the �Measurement� tab you may click �Save image� and save a bit map of your sample.
- To generate a report: Under the �Utilities� tab, click �Export.� Select the sample data you wish to export (Each run is named by the date and a sequence number for that day, with a �CM� file extension). Click continue and the text file will be saved in the folder �C:NucleoViewExport Data�.
- To close the software, click the �Measurement� tab and then click �Quit�.
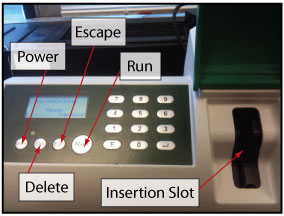
Figure 1: Front of the Cell Counter.

Figure 2: Sample Cassette.
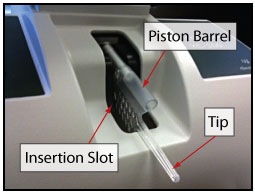 Figure 3: Loaded Sample.