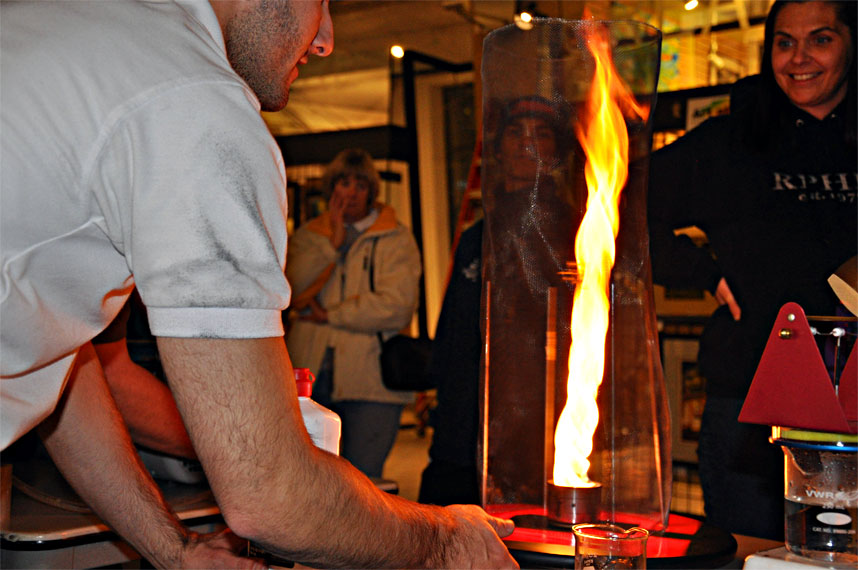
Flame Tornado
Summary
Using a trick of fluid dynamics, a small flame can be grown into a pillar of fire. Lighter fluid is used to make a flame in the middle of a spinning platform and nothing much changes when the flame is spun. But, if a screen is placed around the flame and spun once again, an impressive tornado of flame develops. IMPORTANT!!! Under no circumstances should an unsupervised minor perform the procedures described herein. All the following described experiments and methods should be supervised by an adult who is completely familiar with and takes full responsibility for all possible hazards.
General Information
Essential Questions
- How can the fluid flow of air affect a flame?
- What does a fire need to sustain itself?
Bibliography
E.G. Senkbeil, “Combustion Demonstration Using Updated Flame Tornado”, Journal of Chemical Education, 77(11), pp. 1449-1450
Materials & Methods
You will need the following materials:
- Lazy Susan (or a record player… anything with a base that spins, has about a 1.5 foot diameter, and is expendable.)
- Metal screen material. We used a 1 X 1mm mesh, similar to what you’d find for screen doors at your local hardware store. You’ll need about a 3 X 3 ft (91 cm) piece of screen.
- Cloth, cotton rag, cut to about 4 X 4 inch (10 X 10 cm).
- Adhesive Velcro strips.
- Small tin can. This can be found in the grocery store; dimensions should be about 1.75 inch tall (4 cm) and 2.5 inch (6.5 cm) in diameter.
- Metal bars, dowels or tongue depressors to hold the screen in place. We use 1/4 inch diameter, 1 ft long iron cylinders.
- Adhesive and drill.
- Lighter fluid.
- Lighter.
- A handy fire extinguisher… just in case.
Assembling the apparatus:
- Find the center of the lazy susan, place a pencil about 5 inches (13cm) out from that point and start it spinning, with the pencil held steady. You should then have a 10 inch diameter circle. This will be where your screen will eventually be placed.
- You will need some supports for your screen, to keep it from falling. We drilled 4 holes equidistant from each other on this penciled circle, and placed iron rods firmly in them. You could, though, use many different materials.
- Cut out a length of your screen to be wrapped into a cylinder to match the circumference of the circle you drew and large enough to fit the supports within the screen. Adhere one end of the screen to the other; paperclips or staples do the job, but so would adhesives. NOTE, this screen has to be kept fairly round and centered on the axis of rotation for the experiment to work. If it becomes too bent, the tornado will not develop properly.
- Open the tin can with a can opener, and eat contents (if contents are edible), but keep the lid.
- In the center of the lazy susan adhere a square of velcro (about 2X2 inch), and adhere the other half of the velcro to the bottom of your tin can. Now, when you place the can on the lazy susan, it should remain their securely, even when spun.
- Take the lid to the tin can and adhere a handle to its top. You could use another iron bar, or even a coat hanger for the handle. This lid will be used to smother the flame when you are done with the demonstration.
- When you are ready to begin the experiment place the cloth in the tin can and soak it with lighter fluid. You only need enough fluid to dampen the cloth. Also, it seems we get the best results with the cloth kept below the rim of the can.
- Keep the lighter, lid and extinguisher handy and you’re ready to begin. See the procedure section of this module.
Background for Teachers
When there is no spinning screen, we have a simple flame. The liquid hydrocarbons in the lighter fluid travel up the cloth, which is acting as a wick. When the liquid reaches the temperature of the flame and passes its flash point, the liquid vaporizes and may then react with oxygen to form heat and more gaseous species (CO2, H2O, and others). The flame is dependent upon O2 being constantly supplied by a flow of air into it.
With the added moles of gas created by the combustion, there is a net flow of gas away from the flame, and, with the increased temperature, the air density around the fame is decreased, according to the ideal gas law. As the air is heated it expands and becomes less dense than the surrounding air, and, through principles of buoyancy, that air attempts to rise like a bubble in water. But, as shown in Figure 3, that rising air soon hits and pushes against a ceiling of stagnant cold air. The air rising from the flame begins to cool as it interacts with this air above it. As it cools, its density approaches the density of the surrounding gas, it then stalls, and becomes entrained in the flow pattern travelling back down to fill the vacuum caused by the air feeding O2 to the flame below. In the end, these counteracting forces weigh the flame down and keep it relatively small. Observing the flame in this state, one should notice that it periodically bends and flickers as it struggles to push against the cold air above it, regardless of if it is spinning or not.
Now, if we just add the screen, still nothing much changes. The flow pattern remains unchanged. But if we start the system spinning, we’ll begin to pull a column of air around with the screen. This is caused by a “no slip boundary condition” at the screen’s surface, which simply means that the air molecules at the boundary between the solid surface of the screen wires and the air must be moving at the same velocity. Put another way, the screen pulls and twists the air along with it, like a hand moving through water.
This spinning motion creates a centrifugal force which acts more strongly on the cooler, denser air, pulling this air out from the center and towards the screen. You could explain this force to students as similar to the force on the outstretched arms of a spinning ice skater. With this added horizontal force, normal to the force of gravity, we now, in a way, have a second vector for the buoyancy force pointing less dense gas towards the center of the spinning system. As the cooler air is moved from the center, the pressure in the middle is decreased and this space is filled by the less dense hot gas from the flame. Furthermore, this new twisting component to the flow of air entering the flame improves delivery of O2 and allows more vigorous combustion.
Videos
Array
Intended Learning Outcomes
Students will learn how fluid flow and the resulting changes in pressure may interact with combustion processes.
Instructional Procedures
- Assemble the apparatus as described in the materials section of this module.
- Without the screen, ignite the lighter-fluid-soaked cloth.
- Ask the students to describe the fame, and discuss the reaction and fluid flow involved, as described in the theory section of this module.
- Spin the flame and the flame characteristics should not be altered much; ask the students to explain why.
- Add the screen over its supports and ask the students to predict what will happen when you spin it now.
- Spin the apparatus at about 60 rpm, and an impressive flame tornado should develop, and the fuel should be consumed much more quickly.
- Discuss the observations with the students and the theory discussed in the theory section of this module.
- Repeat as desired. The lighter fluid will likely need to be replaced for each minute of operation and the cloth will need to be replaced after about 10 min of use.
- When you are done, use the tin can lid to smother the flames. To limit smoke, keep the lid on the can for a couple minutes.
Optional Activities & Extensions
- Place a flammable object on a lab stand at the height of the screen, before the screen is introduced, and light the can. The object will be at a height which will not allow it to catch fire. Tell the students that, without adding more fuel or lowering the object or raising can, you will use the fire in the can to light the object. Ask them to speculate on how this can be done. Then introduce the screen and create the flame tornado to ignite the object.